Wednesday, February 26, 2014

From Scotland (EGPH) to Norway (Envz) in the Q400, for Intercity Airways.

A rainy morning at Edinburgh


With a strange obsession, I contemplated landing at Sola Airport (ENZV) in Norway.  The thought of landing along a coastline amid fjords and mountains, sounded intriguing.  Of course the ever changing bad weather along the Channel could be counted on.  With excitement, I planned my Intercity Airways trip from Edinburgh (EGPH) in Scotland, to Sola Airport (ENZV) in Norway.


Flight Plan thanks to Vroute Premium
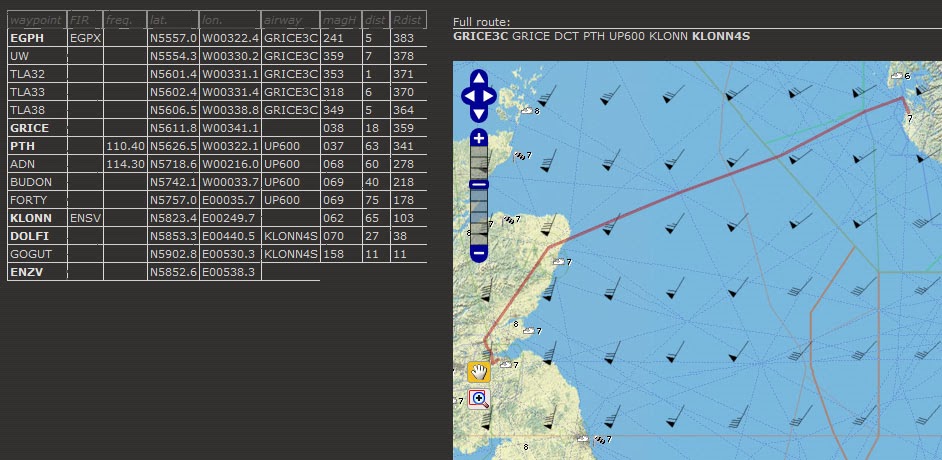
Flight ICX278 was set to take off from Edinburgh at 7:30 am.   At 6:30 am, preparations in the cockpit of the Dash 8 were started.   Of course the morning gave the usual British Isles weather of clouds, rain, more clouds, and a bit more rain.  While prepping for the flight, heavy rain could be seen pouring over the windshield.  My sympathies went out to the ground crew.   But for my duties, the projected weather at Sola was of utmost concern.  The prediction at Sola was no clouds above 1500 ft and 9999m visibility.  This would be perfect for hand flying the Q on final. 


GRICE3C on the ND

EGPH ATIS stated that RW24 was in use for landing and departing.   Once the basic flight plan was placed in box, I set the departure for RW24 using the GRICE3C SID.  This would shoot us North towards the GRICE waypoint, after a sharp turn from our RW24 heading.   From there we would head to the ADN Vor.  Once there, we would leave merry Scotland, flying over the channel towards Sola.   Given the predicted 60 minute cruise time, I did not start browsing the STAR charts for Sola.  My guess, given the reported winds at Sola, was that we would be using runway 18.

Leaving the gate after pushback.

At about 7:20 AM we started the push back procedure from EGPH gate 100.   With the GPU disconnected, push back began.  With the roar of a lion, engine 2 was started.  Once the parking break was set and the clearance checked, engine number 1 was started.  The sky was now afire with different hues created by the rising Sun.   We slowly started our taxi with lights blinking, as we waved goodbye to the RyanAir 737 parked near us. 

Windsock at the beginning of RW24

While cruising down the taxiway, a small GA aircraft could be seen landing.
A look at the wind sock at the beginning of RW24 confirmed the fact that we would be taking off into the wind.  In the Q, standby hydraulics, auto-feathering, flaps 5, and the weather radar were set.   The rain had stopped, as if to say, I will let you pass.  Lining up with Runway 24, I gave a brief check of the instruments, PFD, and ND. 

Ready for Takeoff!

 With taxi light off, landing lights on, I slowly pushed the throttles forward.   The turbines came to a loud roar as we accelerated almost a jet speeds down the runway hitting our Vr with quick succession. 

Rain with a view.

Climb out was anything but boring!   The Q headed up at around 155kts till 1500 AGL was hit.  From there, 185kts and 900 rpm were set.  Autopilot was then activated allowing the Q to follow the SID.   I knew what was coming after a quick glace at the radar.   As the Q climbed towards a suspect cloud, rain started to pour at us.  All the while the visibility came and went with the drop of the hat.  One minute I was getting a nice view of Edinburgh, the next minute it was gone in a haze of white. 

By FL100, we were through the thick of it.

By 10000ft we were through the thick of it.   The expected ice buildup was detected and steps were taken to combat it.  Soon we were on our way towards FL250 leaving the clouds and rain below us.     

Just before the ADN Vor and leaving Scotland.
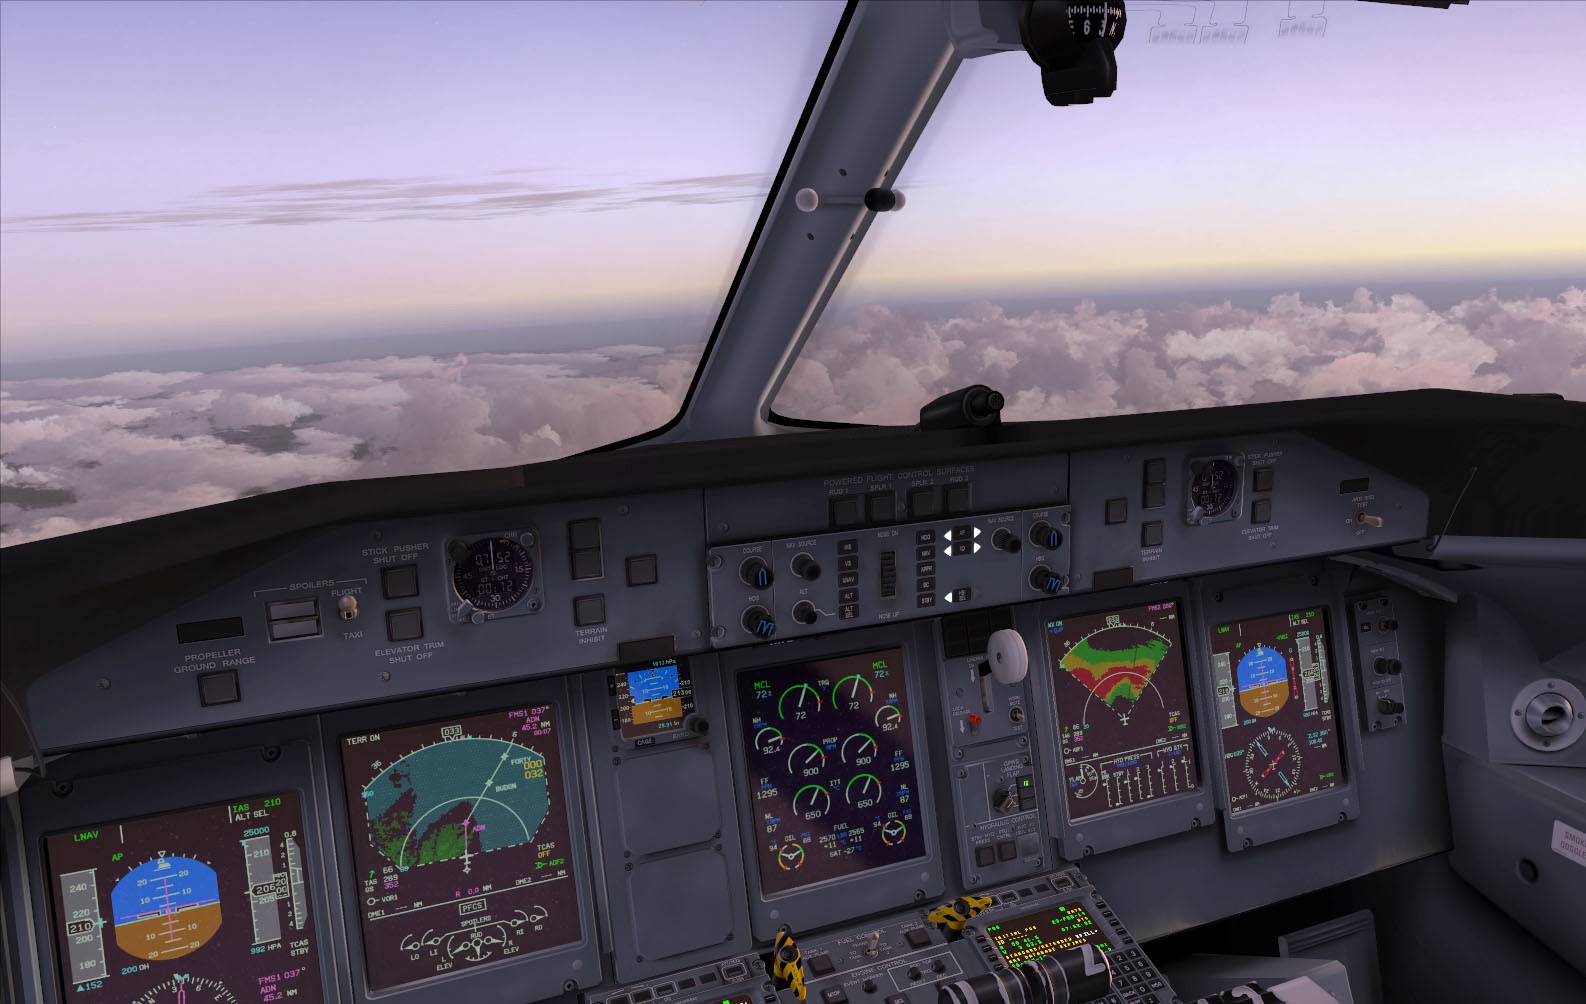
At FL250, the Q was set for MCR, 850 rpm, and 60% trq.   Below the clouds, spots of Scotland could be seen here and there.   Soon we hit the ADN VOR, leaving Scotland all together. 

Across the Channel at FL250

While heading across the Channel, the clouds obscured much of our view below.
 With a strong 60 kt tailwind, the Q was making very good time.  The long 1 hour cruise I predicted, now looked more like 30 minutes.  I started to pour over the approach plates and set us for the KLOON3S Star.    KLOON3S would takes us northwest of RW 18 at Sola. 


The plan was to use the Q’s VNAV to reach 2000ft, 5 nm, before the RANAB waypoint.
This waypoint is directly north of the RW18 ILS.   Once free of the cloud deck, I would disconnect the AP and hand fly the approach.  Hopefully this could be done the minute I was free of the BKN032 clouds.   

ENVZ METAR  1801KT 9999 -RA FEW015  BKN032  07/05 Q1001

You may ask.. “Why hand fly the Q?  Why not just use the heading and approach mode to lead straight to the runway, and disconnect at 500 AGL?”    My answer would be that I am preparing myself for the times that automation does not work.   Our reliance on automation can bite us when we are not prepared.   Unfortunately recent real-world accidents have shown this to be true.  Yes, automation does have its positives.   But to much reliance on automation comes at a cost.  In the US, the FAA has stated that it would like pilots to reduce automation when possible.  I can tell you, that since I have been spending more time hand flying the Q400 , my compentence with the aircraft has increased.  

Descending into sinister looking clouds.

Competence aside, I was faced with a bad feeling in my gut as the Q started the decent.   The cloud layer below was so thick that the coast of Norway could not be seen.   Thanks to the FMC, the approach was nicely marked on the navigation display.   But as the Q flew into the first thick layer of clouds, I felt like Bilbo Baggins from the Hobbit, slowly descending into the dragons layer, not sure what to expect.   Before long, all visibility was gone.  The autopilot flew the route, as I silently prepared the Q for landing. 
    
Zero visibility before reaching FL100

Now my confidence eroded.  "Should I disconnect the AP"  "What if there is turbulence" "What about the 19kt headwind on final".   Trying to gather my thoughts, I concentrated on slowing the Q down, and preparing the cockpit.   Rain started to hit the windshield.   Finally, after 3500 feet, the clouds started to breakup and the coast of Norway could be spotted.

The auto pilot is disconnected.

Just as predicted, we were through the thick of it by 2000 feet.    Now, only 5 miles from RANAB, I shut off the AP.   My hands started to sweat, as they tightly gripped joystick.   Flaps and gear were deployed as I slowed the Q,  trying to stabilize before the turn to final.  

On final for RW 18

Just before RANAB, the turn to final was commenced.  The runway was now visual.   With intense concentration, the dance began with the trim and throttle lever.  Reducing throttle, then adding it, then reducing a bit.   The glide slope and papi lights helped guide the descent.   The Q hovered around 130 kts on final, smoothly approaching Runway 18.   With much ado the Q finally planted its legs on the runway.   The reverse thrust and brakes soon brought us to a slow paces as we vacated the runway.   My job was done, and the 1.5 hr ACARS flight was submitted.   

  Rain starts to come down as we vacate runway 18 at Sola (ENVZ)

Software used:  FSX Gold edition, ASN, REXE, FTX Scotland, Vroute Premium, Intercity Virtual ACARS, Majestic Software Q400 Pilot edition.


Tuesday, February 4, 2014

Flying the Q400 from EGPH to EGBB.


Edinburgh Airport (EGPH) is located 5 nm from the city’s center, just off the M8 motorway.  The airport is the fifth busiest airport in the UK.   The city itself offers a lot for the tourist, given its historical sites and educational institutions.  Edinburgh is also the second largest financial center after London and the seventh most populous city in the UK. Therefore it is no surprise that EGPH is a hub for the virtual airline, Intercity Virtual.


Parked at gate 23 at EGPH

 The regional Intercity carries virtual passengers to and from the capitol of Scotland.  From EGPH, virtual passengers can reach the various other Intercity Hubs and Intercity destinations.  A quick trip across the channel to Sola Norway for example, or a quick trip to Amsterdam.  But for my last flight, a rather tame trip to Birmingham was flown.   Literally a hub to hub route with only 246 nm to be flown.


The flight plan from EGPH to EGBB prepared by Vroute Premium.

Route:
TLA5G TLA N864 DCS N615 CROFT CROFT.CHASE3B

The main route from EGPH to EGBB was already stored into the box.  ATIS stated that runway 6 was in use due to the winds.  After setting runway 6 for take off, a large amount of time was spent preparing the expected landing.  Given the 7 kts winds reported from 180 at EGBB, I expected our arrival runway to be RW15.  This was plugged into the box.


GPU hooked up to the Q


I also punched up the RNAV approach to RW15 for visual reference.   Given the low cloud ceiling going into Birmingham, I expected an ILS approach.  My plan was to disconnect LNAV navigation just after hitting PEDIG.   From there, I could use the heading select to capture the ILS.    Charts were mulled over and prepared.  It must have seemed like forever to my 71 virtual passengers before pushback. Unfortunately, things happen fast when traveling in the Q.   You don’t have hours to prepare.  For many of these flights there is very little cruise time.   Hence, it is good to prepare in advance! 


Leaving the apron.

Soon, we were pushing back and firing up the Q400's turbine engines!   There is nothing like the sound of those engines firing up!  As I taxied out to the runway, various other aircraft could be observed moving about.  A Ryanair jet could be seen taking off from runway 6.  From the South Apron, a left turn was made, and then the long haul down the alpha taxi way.  This gave me time to prep the Q for take off.  5 Flaps was set, weather radar was turned on, condition lever were checked, standby hydraulics and auto-feathering activated.    

  EGPH Runway 6

Soon, we were lined up with runway 6.  The bleed flow was set to min, the taxi lights shut off, and landing lights turned on.   After being cleared, we accelerated down the runway, looking for our V rotation of 132 kts.  Once positive rate of climb was obtained, the gear was retraced.   The Q climbed at about 155 kts up to 1500 AGL.   From there I activated LNAV, and we climbed at a set 185 kts to 10,000 feet with 900 rpm.

Climb out from EGPH

Climb out brought the usual clouds, low visibility, and ice!   These are the three things you can expect when flying around the UK.   Clouds, low visibility, more clouds, more low visibility, along with more clouds.   I quickly turned on the ice-protection equipment.   The low visibility, clouds, and slight turbulence, were no issue thanks to the autopilot.  I monitored our sharp turn from RW 6 to the TLA VOR  with checklist in hand.   At 10,000 feet, the IAS was set to 210 kts, and  we cruised up to FL250.


Cruising at FL250

Upon reaching FL250 the condition levers were set to 850 rpms.   The Q cruised along at about 320 kts TAS with only a slight 13 kt wind off the right side.  I set about preparing for the approach and VNAV descent.  I set the VNAV to hit 2800 ft at 5 miles before waypoint PEDIG.  This would ensure a good height for intercepting the EGBB runway 15 ILS.  I was hoping for a manual approach but clouds would be a problem till descending to 1300 feet.   The good news was that visibility would be very good once under the clouds.

EGBB Metar:   EGBB 18009KT 9999  FEW013/// SCT023///BKN042/// 05/04 Q0981

The ND showed a TOD just after the CROFT waypoint.  Before relaxing to view the sunset off to my right, the ILS frequency and ILS heading were set.  After that, I sat back and waited for the TOD to be reached, enjoying the views.

Descending to PEDIG waypoint.

Once the TOD was reached, VNAV was activated.   This called for a major reduction in thrust.   I tried to maintain 250 kts on the way down.  After 10,000 ft, I maintained about 200 kts.   The 122 kt, V approach was already calculated for a flaps 15 approach.  The landing lights were turned on, along with standby hydraulics, auto-feather, and the other checklist goodies.   Luckily the Q did not build up any ice on the way down!

 Turning to intercept the ILS after PEDIG
Once PEDIG was reach, HDG mode was selected and the Q was guided to intercept the ILS.   The first set of flaps was activated as the Q slowed to around 150-160 kts.  The thick layer of clouds at 4000 feet had just been cleared, but there were still the scattered clouds below.

On final approach.
The ILS was intercepted with APP mode activated.  The ILS localizer and glideslope were followed down through the clouds.   This brought very poor visibility and turbulence before reaching 1200ft.   But by then, the flaps and gear had been deployed.  

Landing EGBB Runway 15
The autopilot was disconnected at around 1000 feet AGL.  Unfortunately, I came in a little too fast...  about 20-15 kts to fast.   But a last minute pull back on the thrust levers allowed for a safe landing.

 Taxing at EGBB
Once on the ground, the landing lights were shut off and the taxi lights turned on.   The T taxiway was followed.   Considering the Birmingham airport only has one runway, it is very easy to find your way around.
The was a lot of activity brewing around the northern terminal.

Diagram of Birmingham Airport (EGBB)

It is important to note that the UK2000 Extreme version of EBGG fixes an important change to the airport.
The FSX version includes the old second runway.   But the airport was completely redeveloped by the year 2000.   Thankfully the UK2000 version shows the airport as it would appear today with only runway 15-33.  Not to mention the amazing details that UK2000 version also adds!  My guess is that FTX England probably corrects the runway problem too.  But luckily I was able to implement all my UK2000 airports into the FTX scenery.

Parking at 85R


Conclusion:
I thankfully parked the Q, set the breaks, and began to shut down the systems.   The flight had gone well and was submitted via the Intercity Virtual ACARS.   Preparing for the approach back at Edinburgh had been a good idea.  Hopefully for one of these trips there clear weather.  Then I can truly enjoy the scenery of the Britain and Scotland.   But luckily ice and turbulence had not been as much of a bother.  It was also nice to get to use both of the two UK2000 airports installed on my computer (EGBB and EBPH UK2000 extreme).    

Software used:  FSX Gold edition, ASN, REXE, FTX England, FTX Scotland, Vroute Premium, Intercity Virtual ACARS, Majestic Software Q400 Pilot edition.


Wednesday, January 15, 2014

Sweetfx...How sweet it is!

Sweetfx at work!  View out of Ant's T28D window.

After smooth sailing I decided to upgrade my FSX.   I wanted the view out of the virtual cockpit to look more realistic. This involved the addition of ENB, Sweetfx, and Shade.  Unfortunately, what followed was 2 weeks of playing around with settings, software, forum suggestions, and a lot of frustration.  Luckily this venture ended with my FSX  running and looking much better than before.

 Milviz B407 over Scotland with Sweetfx enhancing the view.


All of this started with the addition of ENB right after Christmas.  ENB was very easy to add by copying the ENB files to the main FSX folder. This free plug-in could be activated by clicking on Shift F12.
ENB added a lot of contrast to the image in FSX.  My feeling was that ENB was very useful for flying during the day. The cockpit appeared darker depending on the angle of the Sun.  ENB was also good at making distant scenery look more realistic and darker.  Unfortunately, the use of ENB led to crashes to desktop! The last straw was when FSX crashed right after I completed a flight for Intercity Virtual Airline in the Q400. I was still able to submit the flight, but the data was incorrect.

Flying Ant's T28 Trojan with Sweetfx at work

To be honest,  ENB never created a crash to desktop unless it was activated. The crashes on my system appeared to occur when switching between windowed mode and full screen. I had to switch modes to  access to the virtual ACARS system.   Unfortunately ENB had to go and was quickly removed from my FSX directory.  But I may give it a second chance at some point in time.

Lancair off a Hawaiian Island.


This was followed by the purchase and installation of Shade for FSX. Shade added different shadow and lighting textures. While the effect was subtle, it did produce better shadowing especially during sunset or sunrise. Shade did not created any problems on my system. Shade was user friendly and came with and in depth manual.

Shade at work creating nice shadow detail.

Then came the installation of Sweetfx.  This freeware program has been used successfully in various games from Skyrim to Rise of Flight. Sweetfx features effects such as enhanced light, contrast, HDR, and color saturation. I decided to use the GUI program “Flightfx” developed for “Rise of Flight”.
This program allowed me to quickly change the Sweetfx settings in real time.   Flightfx uses Sweetfx 1.4 but may be compatible with the newer version Sweetfx1.5.  (Don't quote me!).   To install I simply downloaded Flightfx and copied the relevant Sweetfx files into the main FSX folder.

Sweetfx placed in spiltscreen mode to check settings

Flying in FSX with Sweetfx provided a very realistic environment and visuals! Color saturation and contrast were greatly increased along with some HDR and light bloom effects.  Sweetfx really added depth to the FSX world.   After using Sweetfx my feelings were that it would be hard to fly without it! The ground and sky looked so much better!   The online Sweetfx database provided a list of preset files for FSX from other users.  I tried a few of the presets for Sweetfx1.4 found on the Sweetfx Settings Database.  The preset created by user Firestorm was my favorite.   Firestorm's preset was copied to my Flightfx settings folder and then checked in Flightfx.

Links:
Flightfx

FSX page at the Sweetfx Settings Database

Firestorm's settings for Sweetfx1.4 and FSX

 But there was a dark side though.  While the benefits of Sweetfx were tremendous, the shimmering of detail was out of control. Once high above the ground the shimmering was not such a problem. But the runway lines and airport details were disturbing to look at! I tried everything from different Nvidia Inspector settings to Sweetfx settings.  On top of this, FSX was not running as smooth either!  This was obvious when I tried to land the Realair Duke Turbine at TNCM and it lagged on landing!

Duke Turbine landing at TNCM  

Pages and pages of Avsim forum information were read to no avail. The shimmering simply could not be eliminated.  The use of the anti-aliasing filter in FSX removed most of the shimmering.  Unfortunately the FSX AA filter also eliminated the effects produced by Sweetfx too. Finally after 2 weeks of playing around I thorough in the towel.  It was time to go  back to my original FSX setup and Nvidia inspector settings. This called for watching the Matt Davie's 2013 Youtube Tweaking guide on youtube and following his suggestions for Nvidia inspector.  It is important to note that his suggestions were take from one of the developers working for PMDG.  I did this and everything was back to normal.

Smooth flying after takeoff with Sweetfx and redone Nvidia Inspector settings.

For the fun of it, I decided to try Sweetfx one last time. To my surprise, “THE SHIMMERING was GONE”!  Yes there was some shimmering but the amount was very low. Infact there was less shimmering then when I first started messing around with my FSX. On top of it, my FSX  ran smoother. As in no micro stutters when taking off in the NGX from a payware airport.

Smooth takeoff in NGX.  NO micro stutters!


At this point, I am as happy as a clam. My conclusion is that when I first setup my system following Matt’s youtube guide, SOMETHING WAS SET INCORRECTLY in Nvidia inspector.  As of now,  my FSX looks much better with the use of Sweetfx and Shade and runs smoother!

The Realair Duke Turbine over Scotland.


Conclusion:
While I did not get much virtual airline flying done, I have much to be thankful for.  The view out of the cockpit is more realistic and gone is the cartoon look of default FSX.  On top of this, there is no micro stutters when taking off in the NGX.  On another note, Active Sky Next and FTX Global have continued to impress me with each flight.   As an added bonus I was able to pickup the Real Air Duke Turbine for a lowly $21 on sale during New Years Eve!    How relevant because 2014 is going to be a great year for flight simming!

Realair Duke Turbine, a real bargain at the current price!


Monday, December 30, 2013

My New Computer!!!

The PMDG NGX at KJAC
 
At 6451ft in altitude, the small puffs of clouds moving across the runway at Jackson Hole Airport were expected.   In the distance, the Grand Teton Mountains glowed in the early morning Sun.  The virtual passengers, happy with their winter escape to snowy Wyoming, were ready to get back home to sunny California.   We lined the  Boeing 737-800 on the runway, having just received clearance.    Reaching down on the throttle, N1 TOGA was set, the engines revved up, and the PMDG 737 lurched forward.   Our jet barreled down the runway to the tune of a steady 27-33 fps.  Once V2 was reached, I rotated, climbed, and raised the landing gear.
Like a phoenix the 737 ascended leaving the highly detailed ORBX Jackson Hole airport behind.  Climbing over the mountains we were soon hit by the expected turbulence.  Finally a higher elevation was achieved as turbulence from the mountains dissipated.   The view from the cockpit was amazing.   Active Sky Next had completely recreated the current weather conditions, utilizing the high definition REX clouds to good effect.  The view of the mountains below was spectacular as this was the next best thing to actually being there.  It was hard to hold back a tear of happiness as I hit the ESC button.  But it was time to end this test flight as a dream had finally been realized!

   Milviz Bell 407 flying to ST Maarten

That dream was to finally conquer the unconquerable FSX and enjoy planes like the PMDG NGX on my own terms.   My older HP labtop could only run at 2.2 ghz and there no special video card installed.  Forget about adding faster RAM or the likes.  I was lucky to be able to get a touch of flight simulation with my older machine.  Addon scenery ran like a slide show, and the NGX could only run at the lowest settings.  Thanks to the Majestic Q400, the A2A C172, lower REX settings, and Matt Davies FSX 2013 tweaking guide.  They gave me a reason to go  on!  But the NGX, Real Air Lancair, and many scenery addons were shelved or never purchased.
 
Milviz Bell 407 lands at KJAC 
 
Then a glimmer of hope as the decision was finally made purchase a new system.  Somehow I became aware of  CyberpowerPC.  Their menu driven system allowed me to modify one of their base models for the requirements of FSX.   Namely, an overclocked Pentium I7, with a cpu cooler.  This was coupled with a EVGA GTX 780 graphics card and 8 gb of Corsair 2133 mhz RAM.   
Realair Lancair Legacy in the Caribbean islands

Changes to the price of the computer were clearly marked before ordering.  CyberpowerPC also included the option to overclock the computer.  I went for the 20% Extreme Overclock for an additional $50.  According to the CyberpowerPC website, should the CPU fail after being overclocked by CyberpowerPC, I would be guaranteed.  The CyberPC forum was also helpful as members answered some of my questions.
 
Majestic Q400 at Flytampa's KBUF


Overclocking!
As many FSX fans know, overclocking a CPU is used to get the best out of the Microsoft's Flight Simulator X.  While the base 3.5 ghz of the I7 was pretty good, I decided to go for the CyberpowerPC's 20% Extreme Overclock option.   Personally, I would rather have people familiar with overclocking do the dirty work for me and guarantee the result.   So far I have been very pleased with the result!   My computer has been very stable and has never displayed any odd behavior.
 
ANT's T28D Trojan, A steal at $17 USD

It must be stated that I do not currently know the exact clock speed of the new computer!   CyperpowerPC states a 20% increase in clock speed or more with the Extreme Overclock option.
So at this time I would label it an unconfirmed 4.2 ghz machine.   I am not sure exactly how to determine the CPU speed from the bios.   There is free software that will stress the CPU and test the actual speed of the processor.   But virus protection warnings from Norton's Antivirus software made me abandon these plans when trying to download these free programs.   So at this time, I will label my computer as an unconfirmed 4.2 ghz machine.
 

The large gaming computer arrives!


 After a few weeks of planning, the new system was ordered.   Pricing the components for the new system, my conclusion was that there was very little to gain by buying the components myself.  CyberPC took a sold 2 weeks before shipping the computer.   The system arrived nicely packed with all relevant material.  
 
 
Below is  a list of the main component for the computer based on the Gamer EXTREME 5200 build.  I have written a quick description as to why each component  was selected.  Of course we could debate for hours on each piece but i made my decision at the time the best i could with information forums on Avsim an Cyperpc:
 
Operating System:  Windows 7 was chosen given the fact that FSX and Windows 8 do not cooperate.  FSX was installed directly on the C drive.
CPU: i7 4770k     Built to be overclocked and the i7 version has added benefit for video editing over i5.   As mentioned before this i7 is expected to be overclocked at 4.2 ghz, but this has not been confirmed.
CPU Cooler: H110i    Suggested by a person on CyperPC forum.  The reviews for   the H110i suggested it was reliable and would keep the i7 cool.
Motherboard:  GIGABYTE Z87-n3H     A Z87 motherboard built for overclocking that was suggested to me by someone on the CyperPC forum
RAM: 8g 2133mhz Corsair      Corsair appears to be a respected supplier of components.  Most information suggested that FSX only requires 8gb.
GPU:   EVGA GTX780     At first I did not expect to spend so much on GTX780 and was hoping to get the 760 or 770 instead.  The EVGA GTX 780 can be overclocked giving near Titan performance.  While it may be overkill atleast I am prepared for future use with the card.
Case:  Borelight CF    The Borelight gaming computer case is quite amazing with its fans and easy access see thru panels.  But the case is Huge!
 
View of nice HD REX clouds as the Lancair flys thorough ORBX CRM
 
Setup:
Matt Davies 2013 FSX Tweaking Guide  is simply the best guide I have seen for setting up FSX.   The guide contains all of the latest information on tweaking FSX. 
His advise is solid, and I have no problems following his suggestions.  The 20 minute video goes thru everthing from FSX settings, Bojote's online config tool, changes to FSX cfg, and Nvidia inspector settings. 
 
 
Picture of my 22" LG computer screen
 
Addon Heaven!
After obtaining my new computer, I went nuts adding numerous addons.   During Christmas and Thanksgiving, I took great advantage of many of the sales going on.  Biggest was the 50-30% sale on ORBX products.  Numerous FTX regions were purchased along with 3 ORBX airports.   I also purchased two Flightbeam Studio airports, four UK2000 airports, and 3 FlyTampa airports.
Active Sky Next was purchased and I an not imagine flying without it.  For addon planes, ANT's T28D Trojan was purchased along with the excellent Milviz B407 helicopter.
Finally, FTX Global was purchased giving me awesome textures for areas outside of the FTX regions.
 
EA's Battlefield 3

 
Other Uses
While the primary reason for purchasing the new overclocked system was the flight simulation, there were other uses.  The new computer has replaced the TV in my bedroom as I now watch Netflix on the new computer.   Both Battlefield 3 and 4 have been purchased and played on the new system. 
The experience is unreal as the new system gives amazing graphics. 
 
EA's Battlefield 4 
 
Amplitube 3 Custom Shop was downloaded.  The sound quality of playing guitar thorough Amplitube 3 is very high.   Playing my Les Paul thorough Amplitube 3 gives an amazing tone!


The Future!
 
In the coming future I hope to do more virtual airline flying and general aviation flying.
FSX looks so amazing now between the ENB, ASN, REX, ORBX scenery, that it is hard to focus!
I literally don't know what to do first!   I never became fully competent with the NGX and hope to train with 737 in the coming weeks.  At some point I will start to train with the Aerosoft Airbus too.
I have already purchased a headset and will purchase FS2crew for these two airliners.  
 
For GA flying, I hope to focus on tours of Africa, Australia, and possibly New Zealand.  
At some point I will also purchase VOX ATC so that I can move towards learning ATC dialog an prepare for flying online.  At some point in time, my setup will probably have to transfer to DX10 mode as all the scenery addons will eventually cause out of memory issues.  But for now, I literally can not believe how amazing flying in FSX has become with the new computer!!!